
*Only Admin Users can upload*
Whether you're a beginner or experienced, this guide will walk you through the upload process step by step.
- How to Upload (Standard Upload)
- How to Upload Multiple Phone Numbers and Email Addresses
-
Uploading Connections to Action Builder
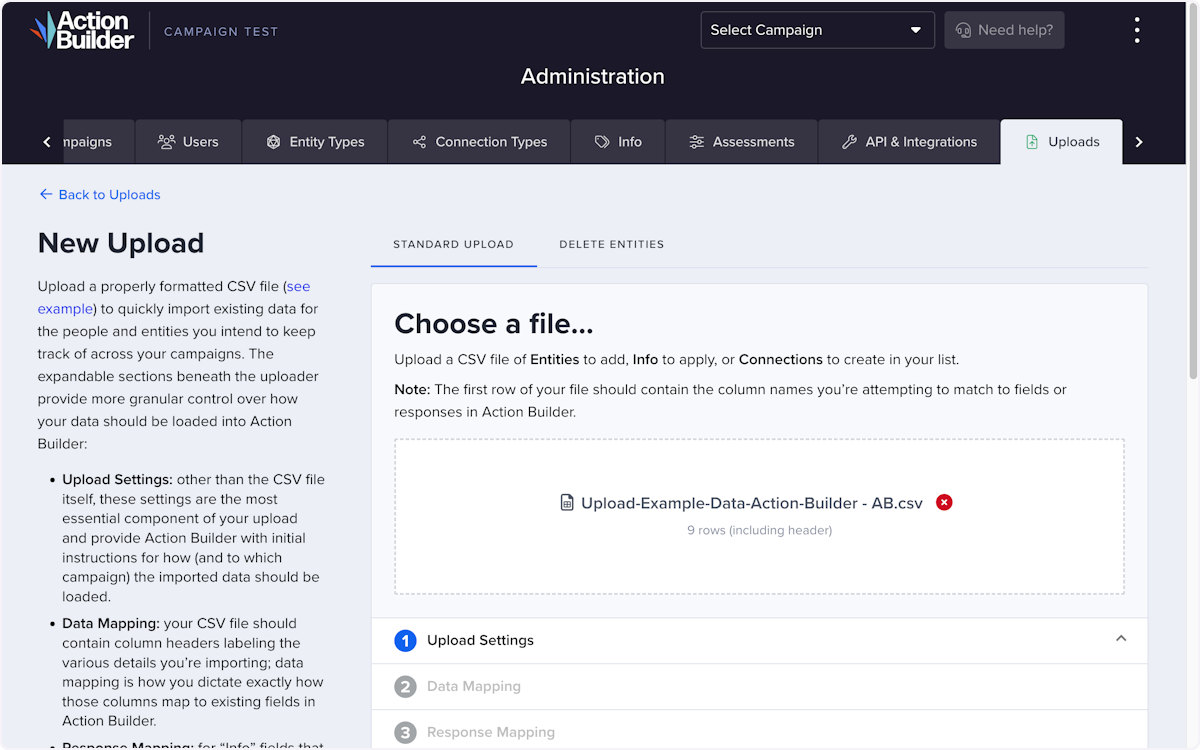
How to Upload (Standard Upload)
→ Open the Main Menu & Navigate to the Admin Section

→ Click on Uploads

→ Click on New Upload

→ Choose the .CSV you want to upload
→ Select the Campaign you want to upload to


→ Select the Entity type you are uploading


→ Select the ID you want to use in order to match you data to an entity
If you're performing a new entity upload without a custom ID, you can skip this step, as Action Builder will automatically generate unique IDs for your entities.

→ Click on Custom ID on the left

→ Click on Upload Column on the right

→ Map to the corresponding Custom ID

→ Click on Confirm Upload Settings

* If you need to map additional field data, click on + Add Another Field

→ Click on Select Field

→ Select the Action Builder field you want to map

→ Click on the corresponding CSV Column

→ Select the Field Response

→ Click on Confirm Mappings
Be sure to double check that your .CSV fields and the Action Builder fields are mapped as you intended. Use the data preview feature to do a quick scan of your mapping.


→ Click on Confirm Response Mapping
If you are uploading new field responses, you must check and confirm the response mapping as well.

→ Click on Review & Confirm

→ Review the proposed upload changes and confirm by checking the checkboxes


→ Lastly Click on Continue Upload...
This is the final step in the upload process. You'll next go to the list view of all uploads where your latest upload will show at the top of the list in the first of three statuses.

Once you click on continue upload you will go to the uploads page.
Note on the Upload Page Functionality:
- Sort uploads by columns such as date, name, or campaign.
- Track upload progress with statuses: File Uploaded, Processing, Complete, and Complete with Errors.
- Click on any status or the 'three-dot menu' for detailed info, including:
- Upload name and ID
- Creation details and responsible user
- Entity type and associated campaign
- Summary of actions (entities added, created, matched, etc.)
- Errors with a downloadable link
- Breakdown of processed vs. total rows.
File Received Status

Processing Status

Complete Status

How to Upload Multiple Phone Numbers and Email Addresses
Admins can complete a single upload and include multiple phone number and email address types.
Here’s how to make the most of this feature:
Instead of using multiple rows to update information for an entity with several phone numbers or email addresses, you can now include each type in its own column(s) in your CSV file.
Example CSV Setup:
Create Separate Columns: For each phone number or email address type, add a new column in your CSV file.
Set the Type: Ensure that the ‘type’ for each phone number or email address is set as static, rather than dynamically assigned by another CSV column.
By following this setup, you ensure that each phone number and email address is correctly categorized and updated.
Tips:
- Make sure to include 'subscribed' and 'status' columns for each phone number and email address to keep your data accurate.
- Double-check your CSV before uploading to avoid any errors.
Uploading Connections to Action Builder
We’ll use Worksites in this example, but the basic process is the same for any Connection types you’ve enabled in your instance.
Entities Must Exist in Action Builder before you can upload:
- Both entities (e.g., people and worksites) must already be created in the platform.
- You must be an Admin to create entities.
Initial Upload of Entities:
-
Start by populating the campaign with the individual entities:
- Upload the People file (e.g., 350 people).
- Upload the Worksites file (e.g., 15 worksites).
Prepare the Connection Upload File:
If you have custom unique ID fields for both Entity types, you can use those to map your Connections. Otherwise, you’ll need to export the data from your Campaign to obtain the Action Builder IDs.
- Open the CSV files for People and Worksites.
-
Create a new CSV file for the connections with the following columns:
- People IDs: This should contain the Action Builder IDs or custom IDs for the People entities.
- Worksite IDs: This should contain the Action Builder IDs or custom IDs for the worksites.
-
(Optional) Add info and notes for the Connections:
- If additional details about the connections (e.g., workplace issues) are needed, create the appropriate fields under "Connection" in Action Builder beforehand.
- Add a column with the field name (e.g., Workplace Issues) and include the corresponding data in the rows.
- Add a column for Notes associated with the Connection to upload qualitative notes about that relationship.
-
(Optional) You can upload multiple Connections in a single file using the same logic as addresses, emails, and phone numbers above. This can be helpful if you want to upload multiple Connections of the same type or two different types of Connections. For example:
- If a person works at multiple Worksites - Create a column for the first Connection ID (e.g., Worksite 1 ID) and columns for the information associated with that entity (e.g., Workplace Issues 1, Notes 1). Create separate columns for any additional entities you want to connect (e.g., Worksite 2 ID, Workplace Issues 2, Notes 2)
- If a person has a Worksite and a relationship with another Person - Create a column for the first Connection ID (e.g. Worksite ID) and columns for the information associated with that entity (e.g., Workplace Issues, Workplace Notes). Create separate columns for the People + People connections (e.g.: People ID, Relationship, Relationship Notes)
Upload the Connections:
-
Navigate to the Upload Page:
- Log into Action Builder and go to the Upload section.
-
Upload Your File:
- Select your prepared connection CSV file and upload it.
-
Map the First Entity:
- Use the People AB IDs or custom ID column to map the first entity (People).
- Click Confirm Upload Settings button to continue
-
Enable Connection Mapping:
- Locate the Connections section and click “Add one now…” to make the Connection mapping fields visible
- Select the Connection Type (e.g., People +Worksite) and set the Status (typically "Active")
-
Match Connected Entities Using IDs:
- Choose the appropriate ID type (e.g., Worksite AB IDs or custom IDs) and map it to the corresponding column heading in your CSV.
- Set the mappings for that connection type’s notes and note date as you would entity notes in a Standard Upload
- If the Connection fields did not map automatically, click the Add One Now… link in the Connection fields section and map the available fields to the columns on your spreadsheet
- Repeat this process for any other connections you need to upload by clicking the Add Another Connection link to get started.
-
Confirm and Complete the Upload:
- Double-check your settings to ensure the mappings are correct.
- Click Confirm to finalize the upload and proceed with the prompts.
Comments
0 comments
Article is closed for comments.